Hello World! Can Can Dancer has moved. Please visit www.cancandancer.com to see new DIY posts (and all past posts too!). Happy Crafting!

Crafty Superstar!

Back this summer, I was approached by Cat, of Cut Out + Keep, asking if I would like to be featured as one of their Crafty Superstars. I immediately said YES. I have been using Cut Out + Keep since I was in Junior/Senior high for crafting inspiration.

I am so excited to be featured on the main page and at the lead of the Superstars tab for an entire week! Every day, for a week, a new crafting tutorial will be revealed for those who visit Cut Out + Keep.

Past Crafty Superstars include Erica Domesek (PS I made this) and Mark Montano (TLC). Check out the Can Can Dancer tutorials and an interview here: Link.


(Look its MEEEEEE! on the footer of every page this week. :) )

Happy almost New Year! And happy crafting!
~Crafty Superstar #109 (aka Can Can Dancer)

Christmas Tree Decorating

Here is another post courtesy of my mom. My parents have multiple Christmas trees in their house each with a different theme- purple/girly, angels/pastel, santas/red and sometimes a cowboy tree. My mom took step-by-step pictures of how she decorates her red tree.

Check out below to see how:

Here is a naked 9 ft pre-lit tree.

This is a tree skirt that my mom has had for over 20 years. My aunt made it. It even is reversible with green on the other side.

Find some large ribbon to decorate the tree with. (I have sparkly purple on my own tree and I got it on clearance at Michael's after Christmas last year- leftover from the custom floral department.)

This year my mom decided to use candy-cane looking ribbon. She gathered 12 loops and left the two tail ends free. She secured the 12 loops with thin wire. (She bought her ribbon from Costco for $7ish)

Wire the bow to the top of your tree and cascade more ribbon down the body of your tree. (6-8 rows of cascading ribbon depending on the thickness of your wire.)

My mom bought red Christmas ornaments at Kmart.

She also gathered personal ornaments that matched the tree. (I made some of them a LONG time ago. lol)

Here is the tree with ribbon, red balls and homemade ornaments.


She also bought simple metallic bows at Kmart to fill in any gaps.

She also added a star to the top of the tree (It's hiding behind the ribbon. lol)

Here are their new custom cabinets- with the shelves all filled. Check out how they built them here: link.

Cinemagraphs

Hello World,

I currently am in a Digital Imaging class and our latest project was to revise an icon. I have always adored Dorothy, and I made cinema-graphs for the first time!

And now that I have used an expensive digital SLR, I am hooked. I am now saving up for one, along with a less expensive lens.  The only problems I came across with my cinemagraphs was I could not get the file size small enough with CS6. I compressed these puppies multiple times and they still are not small enough.

I only used the last three for my project, but I had them arranged in a different formation and the title is "Waiting to __________."

Enjoy! And have a great Thanksgiving! 


'


DIY Built in Bookshelves

Hello World,

In a previous post, I blogged about how my parents installed custom cabinets in the dining room and saved themselves $5,000.  My parents also recently installed built-in bookshelves in the living room.

Check out below for pictures (thanks to my mom):

Here is the living room before. My mom thought the TV looked weird with the way the room looked. We also have a stove because we live in Idaho... and the winters can be rough! (The National Guard actually had to shovel snow off of my high school a few years ago because the roof was starting to cave- and the school was only 10 years old.)

My parents bought unfinished cabinets from Home Depot.  (4 upper kitchen cabinets were bought total)

They bought a discounted fireplace mantel. (Note from my mom: Double check the measurements you need for the fireplace- including cabinet spacing and trim.) 

They also bought a discounted gas fireplace insert. My dad sells stoves/BBQs here: www.stovesdirect.com.

They picked a fireplace that was narrow- so it wouldn't eat up too much space.

My dad build the top frame out of 2x4's and plywood.  His piece is sitting on top of the kitchen cabinets. He cut them to size and made the back panels with thin plywood sheets.

He installed the fireplace and added trim to finish the edges.

My mom painted all the trim in our garage on saw horses and over drop cloths.

My mom used one gallon of primer on the build-ins. She also would sand a little between paint coats.

My mom used 1.5 gallons of semi gloss paint- with 2 full coats of cream paint.

My dad also cut oak plywood to size for the shelves.

Because it is chilly in Idaho, they primed and painted the shelves inside.  This actually is our basement with drop cloths on our pool table.

Almost finished- still needs to be staged/put items on the shelves.

My mom doing final touchups.


My parents bought these hammered metal knobs at Habitat for Humanity for $0.50 each.

Check out how the living room looks now here: link.


Candle Jars to Succulent Garden

In a previous post, I blogged about the free Bath and Body Works mini candle I received complimentary of Influenster. Well, I actually had a few burnt up ones hiding in my junk drawer. (I already milked all the scent out of the wax by placing the candles on my candle warmer.) I didn't want to just throw the jars away, and I found a way to reuse the little glass jars.

My friend's grandmother gave me a small chunk of her succulent garden this summer, and since then it has been budding like crazy. I already have replanted some buds in old tea cups and such, but here is a new take on the succulent garden that is super easy and looks pretty modern!


Check out how to make your own below:


1.   Gather your jars, they can be any size. Here I chose the BBW mini candles.

2.   Peel off the labels. The new labels are way easier to remove than the ones from this summer. 

3.   Wipe.wash off any remaining sticky residue.

4.   Either melt the candle on a candle warmer or in a saucepan full of simmering water. You also could pop out the wax with a spoon. Pour the melted wax into an unwanted plastic/glass container. I poured all my wax into an empty 4 oz candle jar. (it ended up looking similar to sand art... but with wax.) 

5.   Fill your mini candle jar with moist soil.

6.   Evaluate your succulent garden, and determine where some 'breathing' room would be needed for your larger plants. 

7.  Gently, snap off a succulent bud, and trim the stem to have a clean break.

8.  Put the stem into the soil and in a few days your succulent will start to take root. It's that simple!


You also could use this same technique with a larger candle jar and plant multiple buds in it.


Does this candle jar look familiar? I removed and reused the wax in this tutorial: link.


I had quite a few mini candles in my stash.  These look cute lined up on a windowsill, and would be a REALLY easy gift to give someone. You also could decorate the jars with rhinestones, glitter, ribbon, ect to make them really unique! 


Such cute little succulents!  When they get too large for the mini candle jars, just replant them in a large container. (Oh, and water them periodically and let them get enough sunshine to be happy campers!)

IDEA: You totally could make a few of these and use them as PLACEHOLDERS for Thanksgiving! Each person would get to take a mini plant home with them!  I bet they would be thankful. :)

(Disclaimer: I was not paid in anyway to make this tutorial. I really do have a ton of burned-up candles.. lol)

New Display for Zipper Hair Pieces

I not only sell my zipper flowers online at Etsy, I also sell them at the Prichard Art Gallery here in my college town. Previously, they were displayed in a wooden jewelry box, but I think this new display will encourage more sales since they are all visible instead of flipping through them like a book.

I took an old window, broke the glass out, and then used a putty knife to remove the cracked/leftover glass and sealant.  I then scrubbed the chipped paint off where-ever it was loose (so it didn't shed all over the shelf).  I put 8 hooks in the window frame and strung wire between each set to hang my items on.


Look at my new professional tags! Fancy!

They are all so unique!  All made with vintage buttons and repurposed/vintage zippers.

And of course I had to include some of my Moo Minicards. I actually have to bring some more to the Prichard, my business cards are almost all gone!


DIY Custom Cabinets (saved $5000!)

Hello World,

My parents recently installed custom cabinets in our dining room.  The original estimate from Home Depot for the cabinets and trim was around $7,000 (not including the countertop and hardware).

They wanted the cabinets in the dining room to match the kitchen, but our kitchen Thomasville cabinets were discontinued. So, my parents DIY-ed and made their own cabinets/counter for $2,000, saving themselves $5,000!

Check out below for pictures (thanks to my Mom):

My parents ordered and picked up standard, unfinished, oak cabinets from Home Depot.

Here is a closer look at the plain cabinets.

Previously, there was a china cabinet in the dining room. (But they needed more storage- that thing was packed previous to this picture.)

Here are the plain cabinets installed thanks to my Italian father.

My dad bought a long butcher-block countertop, which he sanded and stained. (My dad mixed black acrylic paint and stain together to get this color because the stain alone wan't dark enough.)

My mom carved everyone's names in the countertop. 

My mom used a primer on the outside surfaces of all the cabinets.

My mom sanded, primed, and painted all the doors of the cabinets.  She painted the doors and trim a light cream color to match our current kitchen cabinets.

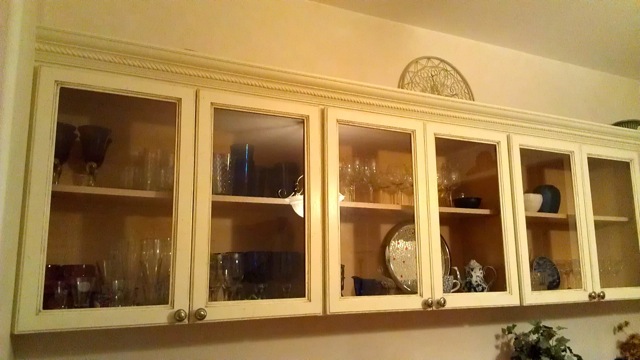
Then my dad installed the finished countertop. My dad also installed the glass panels.  He bought glass for $8 a door (compared to $120 per cabinet door through Home Depot), cut out the wooden faces of the doors with a router saw and popped the glass in place.

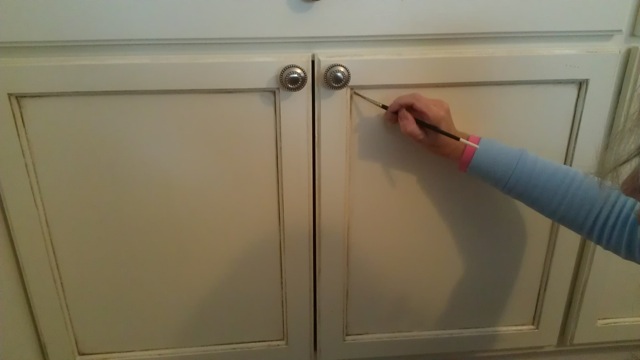
My mom then painted all the edges of the cabinets with a mushroom brown paint. She rubbed the paint in random areas with a sponge to make them look more vintage. 

She painted in all the crevices with a tiny paint brush.

My mom also aged the cabinets to make them match the kitchen. She used forks and screws, and lightly hammered them into the wood surface.  Next, she rubbed brown paint into the dents and wiped off the excess with a damp cloth.

She also found the knobs at Lowe's for $3.00 each.

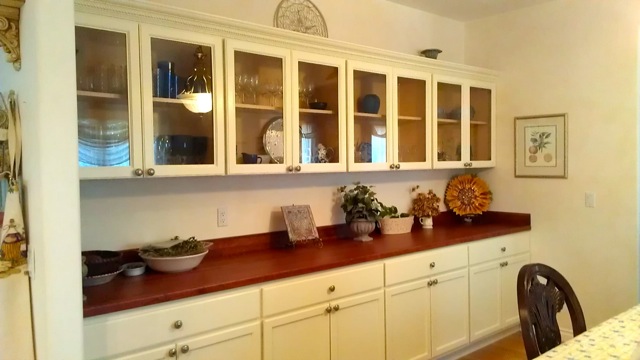
They added braided trim and crown molding to the top of the cabinets to match the kitchen,

Plenty of visible storage!

And here is a picture of or kitchen island with the old cabinets.  Pretty decent match huh?