Hello World! Can Can Dancer has moved. Please visit www.cancandancer.com to see new DIY posts (and all past posts too!). Happy Crafting!

Cheesy Pull-Apart Bread

Pinterest has inspired me to try so many new recipes!  I found this one a while ago, but never remembered to buy a loaf of dinner bread. I followed the recipe here: Link.


Except when I made mine, I used ciabatta bread (my favorite!) instead of sourdough, and used sharp cheddar and parmesan instead of provolone. (I used these cheeses instead because my provolone had gone bad... :(   ) I also omitted the mushrooms due to personal taste and forgot to get poppy seeds.

This bread was soooooo delicious.  Oooey gooey cheese that pulls apart so easily! I definitely will be making this for a party in the future. Next time, I will use more of the original recipe though because poppy seeds would top it off wonderfully.


DIY Ombre with Simply Spray

The FashionArtProjects team sent me some free goodies, and I decided to use the Simply Spray for fabric to ombre a tank.  I bought the tank top at a Humane Society thrift shop for less than a dollar.  I wasn't a big fan of the beige color, but I did like the high-low hem.


Check below to see how to do this technique as well:


1.  You either could lay the shirt down on a tarp, or do what I did, and hang it from a clothes-line.  I chose this method so I could attack the front, back, and side seams all in one sitting.  Make sure to have a tarp underneath if you are over deck, ect. because of the spray paint fall-off.

2.  I used all three colors they sent me.  I first sprayed the Black.  I spray more at the bottom than the top to create the ombre look.  Next, I sprayed the Blue Jay color.  I sprayed it over the black and continued the ombre.  I noticed I had missed some spots with the blue, so I sprayed the Lavender on last.  

3.  If you are happy with the color, just let dry and tada!  The bottles say to wait 72 hours before washing, but I wanted mine to be more faded.  I let mine dry for four hours, and then washed the tank in my sink with luke-warm water. I used a wee-bit of detergent and then put it in the dryer on low. 

4.  The bright colors faded because I washed it too soon, but I really like it!  It was so easy to do and now it is a faded, indigo-ombre tank!  I can't wait to wear this top, and the fabric spray paint didn't make the shirt a crunchy texture. 


Etsy Treasury- Ombre Obsessed

I have no idea when this ombre trend started, but I love it! For the longest time I just thought it was a gradient effect.  Various sites on the internet define 'ombre' as a gradual shade of color.  

But, in my interior design class we were taught that a 'shade' is: adding black to a color to darken it, while a 'tint' is: adding white to a color to lighten it. Most of the items below are pure color towards white, aka a tint, while others are more gradient in appearance.  In fact, the original definition says ombre is: an old three-handed card game! Language and translations are so complicated! lol

Anyway, enjoy! (PS aren't those spoons amazing!  And I bet they wouldn't be too hard to make!  I'll put that on my to-do list.)


'Ombre Obsessed' by bold211

Youthful and fun colors, perfect to brighten anyone's day.


Ombre Wooden Spoons
$25.00

Miniature Playscale Ora...
$12.00

Bib necklace turquoise ...
$52.00

Ombre Goose Feather Fas...
$49.95

Bird Silhouette Ombre W...
$10.00

Peach Ombre Chevron Iph...
$12.00

Green Ombre Wall Decor ...
$20.00

Felt Garland: Ombre Pur...
$10.80

ombre tumbled stone coa...
$16.00

BZR Ombré tights in Su...
$50.00

Lavender Sachets, Green...
$24.00

Orchid Ombre Post Earri...
$12.00

BLUE OMBRE Tie Dye Dres...
$24.00

HAPPY - Wall Art Print...
$18.00

Yellow and Green Gradie...
$8.00

Fuchsia Purple Ombré B...
$180.00

DIY Whitewashing (& Easy Wedding Gifts)


I went to a wedding this last weekend, and gifts were not expected.  I never show up empty handed to parties or events, so I whipped up a simple sign.  

Right near my house, the city is tearing down an old grain silo.  They have three huge bins sitting in front of it which are labeled "free wood." My boyfriend was so kind as to rummage through the bins to find some nice salvaged wood. He grabbed me about five pieces of wood, and the one I used below seemed the most fitting. It had an old screw in the center, as well as 5 other pre-drilled holes.

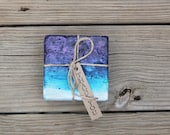
The wood was an average color, but I wanted a beachy look, so I whitewashed it myself. I chose to whitewash instead of just paint so that the wood grain would still be visible (similar to a stain). Check out how to do it too, below:


1.  Gather your supplies: a chunk of wood, some water, white acrylic paint (or any other color), and a paintbrush.

2.  Make sure your wood is nice and clean, sand the edges, dust off any remaining sawdust.

3.  Mix 70% water with 30% paint.  I made too much, so I placed it in a covered container to save it for later.  (Helpful hint: If you ever pour too much paint or don't want to wash your brushes/rollers you can place them in plastic bags and put them in the fridge.  The paint won't harden. :)  )

4.  Mix the water and paint until you are satisfied.

5.  Paint the whitewash mixture onto your board.  Make sure to get the sides of the wood as well, for a finished look.  Let dry between coats. I did 2 coats.

6.  Let dry completely, then personalize it.  I hand-painted their names on it.


I used the painting technique here for the lettering.  I used a scribe brush, but I feel the bristles were too long and at times difficult to control.  Next time I will use a different detail brush, so that my letters are all perfectly consistent in size.  

I tied a piece of hemp yarn through each pre-drilled hole, and double-knotted the bows.  Next, I braided three pieces of hemp-yarn together, looped it through the bows, and tied knots at both ends to keep it from coming undone.

Then, I painted one side of each close-pin, and clamped them to the braid-so pictures could be hung.  For the top hanging string, I looped more hemp yarn through the pre-drilled holes and tied them together in the center.


Magazine Party Balls

Remember Mark Montano from TLC? Well, now he has some great, easy DIY tutorials on youtube!  I had a friend over and we tore apart a bunch of my magazines to make some party balls.  (I have mine hanging up even without a party. lol)

Check out the video below!


I tried to find magazine pages that were similar in color.

Hot glue every other notch on alternating pages.  I didn't listen to this at first, and the ball was not a ball at all. 


Leftover scraps from cutting out the notches. Save for homemade confetti? 


Mine is the orange one, and the blue one is my friend's. I need to make more of these. 


Pinterest Fail

Hello World!  I had a crafting day with a friend of mine, and we tried to make our own glasses out of old bottles.  A link to the tutorial: HERE. I couldn't get it to work for me. We tried three times, with different materials.  I think I'll try again later, after reading the comments on her blog post.

Here are some pictures of the yarn on fire. (Which was pretty awesome to play with. lol)

This was the second attempt, so we increased the amount of yarn, in hopes that it would get hotter with more area to burn.

As a last resort, I tried a cotton fabric instead of yarn. The flames were so hot and huge with fabric! (I know the edges are not straight) But at this point I really just wanted the bottle to break.

I think it might not have worked for me because:
A. My bottles were too thick.
B. Wrong type of yarn.
C. Nail polish remover too weak.
D. Other

If anyone tries this technique out and is successful, please let me know!  Any trial and error advice would be greatly appreciated. I have so many bottles that are destined to be glasses someday.


Creamy Tomato Pasta

Sorry for the hiatus! I was out of town June 25th-July 4th, and had no way of uploading anything to the blog! (And by out of town I mean, driving from the west coast all the way to the east coast!)

I have been trying to mix up my meal plan, so I'm not always eating tacos and homemade pizza. I tried a tomato-cream sauce via allrecipes.com. I changed my version slightly, because I am a lover of garlic.


Here is the recipe (with my modifications in bold):

2 tablespoons olive oil
1/2 onion, diced
3 cloves of garlic, minced
1 (14.5 ounce) can Italian-style diced tomatoes, undrained
2 tablespoon fresh basil leaves
3/4 teaspoon white sugar
1/4 teaspoon dried oregano
1/4 teaspoon salt
1/8 teaspoon ground black pepper
1/2 cup heavy cream
1 tablespoon butter
1 teaspoon red wine vinegar (if you don't want it too sweet.)

In a saucepan, saute onion and garlic in olive oil over medium heat. Make sure it doesn't burn. Add tomatoes, basil, sugar, oregano, salt and pepper into a blender and blend until consistency is slightly chunky. Pour blender mixture into saucepan. Bring to boil and continue to boil 5 minutes or until most of the liquid evaporates. Remove from heat; stir in whipping cream and butter. Reduce heat and simmer 5 more minutes. Add red wine vinegar, to neutralize sweetness if desired.

Pour over or toss with cooked pasta. Grade plenty of parmesan cheese and dress it up with a fresh basil leaf on top.

If you want to try the original instead click: HERE.